Crochet boiled egg in cup- free pattern
- laura5243
- Feb 8
- 5 min read
Check out my Youtube video tutorial for this pattern here: https://www.youtube.com/watch?v=_O7h4c9J0do
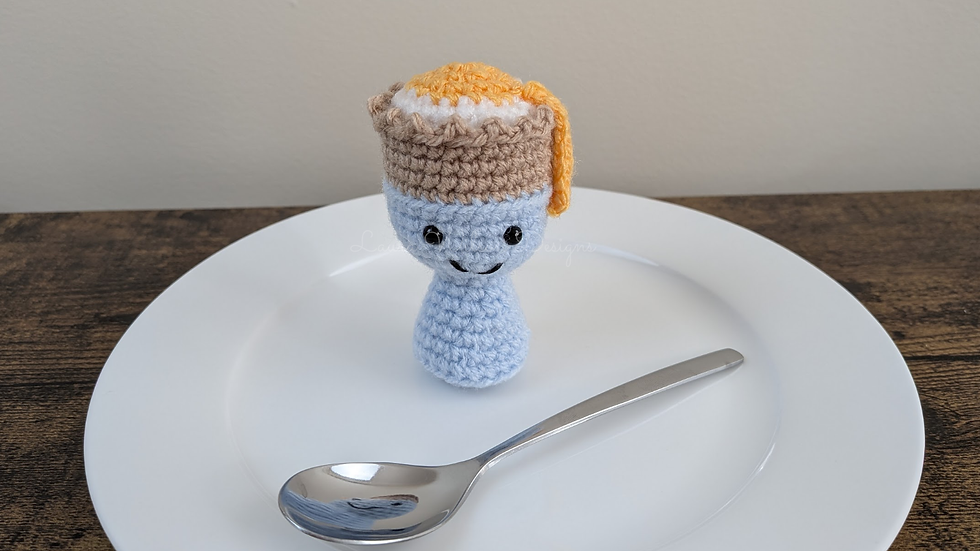
Here in the UK we love our soft boiled eggs with runny yolk, served in an egg cup with soldiers (thin slices of toast) that can be dipped in the yolk! Now you can crochet your own egg in a cup, with a cute face!
The cup and egg are all crocheted as one piece and the shell edge is crocheted on, the only piece that is sewn on is the piece of yolk dripping down the side. When made with the stated yarn weight and hook size, the finished egg is approx 8.5cm tall and 4.5cm wide.
How to change colour when working in single crochet:
Change colour as you finish the last sc of the current round- push hook in stitch, yarn over and pull through, pull a loop of the new colour through the two loops on the hook. This completes the last sc in the previous colour and changes to the new colour for the future stitches. Don't work the other colour into the back of your stitches as it won't be needed again for this pattern, cut the yarn and tie the two short tails together in a double knot.
Materials needed:
DK yarn in light blue, beige, white and yellow
3mm crochet hook
5mm black safety eyes (you can use 6mm instead if you cant get hold of 5mm)
Black embroidery thread
Stitch marker
Scissors
Stuffing
Yarn needle
Pins to help with sewing the yolk piece
Abbreviations (US crochet terms):
st- stitch
mr- magic ring
ch- chain
sl st- slip stitch
sc- single crochet
inc- increase
invdec- invisible decrease
BLO- back loops only
Starting in light blue, with the base of the egg cup:
Rnd 1: 6 sc in mr (6)
Rnd 2: inc in every st (12)
Rnd 3: (sc in nxt st, inc) x6 (18)
Rnd 4: (sc in nxt 2 st, inc) x6 (24)
Rnd 5: In BLO: sc in every st (24)
Rnd 6: (sc in nxt 6 st, invdec) x3 (21)
Rnd 7: (sc in nxt 5 st, invdec) x3 (18)
Rnd 8: (sc in nxt 4 st, invdec) x3 (15)
Rnd 9: (sc in nxt 3 st, invdec) x3 (12)
Rnds 10- 11 (2 rnds): sc in every st (12)
Rnd 12: (sc in nxt st, inc) x6 (18)
Rnd 13: (sc in nxt 2 st, inc) x6 (24)
Rnd 14: (sc in nxt 3 st, inc) x6 (30)
Rnds 15- 17 (3 rnds): sc in every st (30)
Rnd 18: sc in every st, change to beige as you finish the last sc (30)
Start stuffing as you go but only stuff the bottom part for now - use the end of your hook to push it down through the narrow part. Make sure the base still sits flat.
Rnd 19: In BLO: sc in every st (30)
Rnds 20- 21 (2 rnds): sc in every st (30)
Insert 5mm safety eyes between rnds 16 and 17, 4 stitches apart, on the front side (the side without the colour change).
Don't fasten off, make mouth now:
Cut a length of black embroidery thread, approx 30cm long, tie a double knot near the end of it, thread onto needle and go through the inside of the cup, coming out between rnds 14 and 15, in line with the inner edge of the eye, make a diagonal line going across 1 rnd, going back in line with the middle of the eyes, come back out on the other side and make another diagonal line going back in the same middle point, to make a wide V shape. Then find a loop somewhere on the inside on the back of a stitch, go through it but not all the way, leave a loop and go through it from behind, pull tight to make a knot. Push end inside cup. This is how you fasten off when sewing.
Continue crocheting:
Rnd 22: sc in every st, change to white as you finish last sc (30)
Rnd 23: In BLO: sc in every st (30)
Rnd 24: (sc in nxt 3 st, invdec) x6, change to yellow as you finish last invdec (begin invdec as normal- pick up front loop of nxt st, then front loop of st nxt to that, yarn over and pull through 2 loops, pull a loop of yellow through the last 2 loops) (24)
Continue stuffing as you go.
Rnd 25: (sc in nxt 2 st, invdec) x6 (18)
Rnd 26: (sc in nxt st, invdec) x6 (12)
Rnd 27: (invdec) x6 (6)
Fasten off leaving long tail. Thread tail onto needle and come up through the front loop only of each of the last 6 stitches, from the outside going upwards, pull tight to gather the stitches together and close hole. Find a loop nearby and fasten off in the same way as you did with the mouth. Weave tail through the middle of the hole and come out at the side of the egg. Cut yarn close to the edge of the work and use the end of your needle to push end inside.
Cracked shell edge:
Push hook through the remaning beige front loop at the back before where you changed colour (the higher up one), pull up loop of beige, ch 2, sl st in 2nd st from hook, skip 1 st on the beige front loops, sl st in nxt st, repeat all the way around. When you get back to the start, sl st in the same st that the first one is in. Fasten off leaving short tail. Secure the starting short tail by fastening off around a beige loop, then weave both ends inside, cut the yarn close to the work and use the end of your needle to push ends inside.
Dripping yolk piece:
In yellow:
ch 11, starting in 2nd st from hook: sl st in nxt 8 st, sc in nxt 2 st, sl st in same st.
Fasten off leaving tail for sewing. Weave short tail into the back of the stitches, trim excess.
Position it to the side of the eye, with the sc end at the bottom (the big end of the drip), pin the top part to the edge of the yellow part on the top of the egg, sew the bottom part to the blue part with a couple of stitches, then weave through the egg and come out where the top of the piece is and sew it down with a couple of stitches on the underside. Fasten off in the usual way and weave in ends.
The egg in a cup is finished! I'd love to see a photo of yours, you can share it with me by tagging me on instagram @laura_wilson01
Check out my Etsy shop for more patterns: https://laurawilsondesigns.etsy.com
This pattern was designed by Laura Wilson of Laura Wilson Designs. This pattern is strictly for personal, non-commercial use. Copy, distribution or commercial use of this pattern or any of its parts is not allowed. Please give credit if posting photos or selling finished item. © Laura Wilson 2026- All rights reserved.


Comments